XML is dead – long live JSON

While I loved the power of XSLT – you may have noticed from some of my other posts – I was never really a big fan of XML.  Yes, I used it when I had to but it always seemed like a lot of effort to get anywhere – and don’t get me started on the fun (??) I have had parsing poorly formatted XML.

JSON on the other hand – I almost look for excuses to use it.

In SharePoint, JSON is gradually becoming increasingly prevalent while the use of XML almost seems to be limited to legacy needs.

So what can we do with JSON in SharePoint?
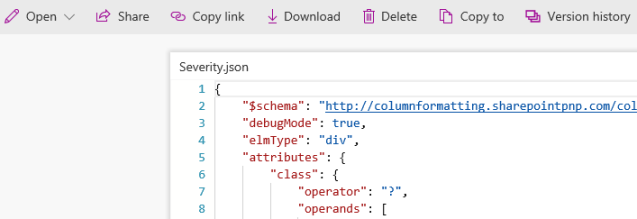
JSON Editor

Firstly, this almost went unnoticed, but JSON is now a recognised document format in O365 and even has its own online editor.  So you can save a JSON document to a SharePoint library and select preview to view and open to edit.  Also nice to manage version control.
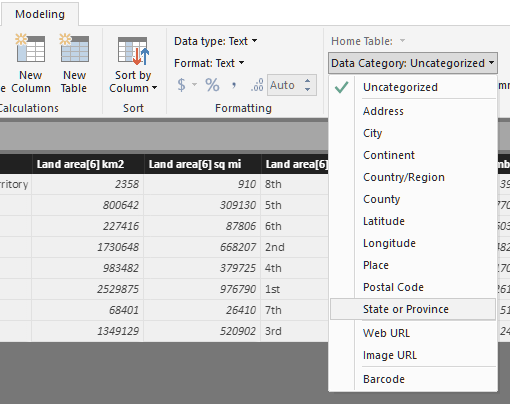
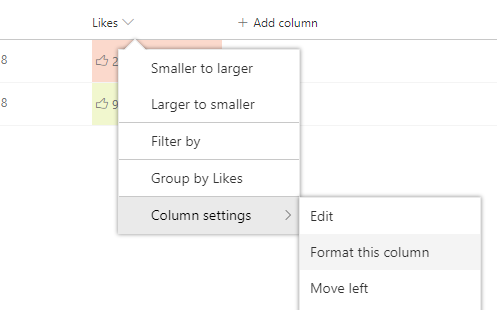
JSONEditor

Column Formatting

While I am still in mourning over the premature demise of JSLink – yes I know it is still there but I am sure the writing must be on the wall – I am encouraged that we can now customise how columns appear using JSON.

ColumnFormat.PNG

There are some good posts on this to get you started such as:

Use column formatting to customize SharePoint

For those who have been following along for a while, this is a nice logical next step from XSL Link and JSLink, allowing non-developers to apply some simple formatting to SharePoint list columns.  However, it does feel a bit unfinished.  I am hopeful it will mature a bit over time to provide more capability but at the moment it definitely feels a bit constrained.

Site Themes

If you have not tried it yet take a quick look at the Theme Generator.

ThemeGenerator.PNG

This is a great tool to create custom colour themes for SharePoint – and guess what format the output is to apply to your site?  JSON of course!

Again, Microsoft have provided some good posts on using this:

SharePoint site theming

However, note that this only applies to the new style of SharePoint sites.  You cannot just apply these to the more traditional team sites etc.

Site Configuration

Also just for the new style of SharePoint sites, JSON can even be used to customise sites.  Create a content type, add a list, apply a theme, even trigger a Flow – and all using JSON.


{
"verb": "createSPList",
"listName": "Customer Tracking",
"templateType": 100,
"subactions": [{
"verb": "setDescription",
"description": "List of Customers and Orders"
}]
}

Site design JSON schema

This is a great way of setting up templates and ensuring new sites can be provisioned in a consistent way.  However, I have to say that while the JSON is relatively straightforward, applying it is a bit more of a challenge.

Digital Workplace Conference

I will be presenting all this and more at the Digital Workplace Conference in Melbourne on 15-16 August 2018.  Come along and say hello.

Posted in JSLink, SharePoint | Tagged , , , , , | Leave a comment

Digital Workplace Conference 2018

I am honoured to have been selected to present at the Digital Workplace Conference, New Zealand in May 2018 and even more lucky to be co-presenting with Keith Williams, General Manager of Marine Rescue Queensland.

18612 STP Badges I'm speaking

We released a new Azure-based app in January and finally retired a rather dated ASP application (no not .NET) which was hosted on Windows Server 2003 and using SQL 2005.  Having served well for many years it was definitely starting to show it’s age.

Every time one of our rescue vessels goes in the water we capture details in our new app such as how much fuel was used, how many people we assisted and how long the vessel was at sea.  We also use it to keep track of around 1500 volunteers along with their training records.

Data quality has long been a challenge for us with most of our crew members much more interested in being at the helm of a vessel than behind a keyboard.  We intentionally took this into consideration when designing the new app and have employed a few different techniques to improve the data which is input.

A key example of this is giving something back.  I will try not to get on my soapbox but it has long been a personal crusade to provide something which shows where the data is going or how it is used.  Too often I have seen organisations demand their staff provide all sorts of data but it just disappears into a black hole.  There is very little incentive in that scenario to put any effort into ensuring the data is useful or accurate.

Almost every page in our new Portal (or is it porthole) contains some statistics from the database relevant to the that page.  I mentioned persons assisted above.  Showing the total number of persons assisted for the current month means that as soon as somebody enters a new activation they can see those statistics change so they know they are making a difference.

Encouraging this level of interest in the statistics means that the quality of the data is improving – which in turn means that the quality of the statistics is improving.  Now that is a great improvement cycle where everybody benefits.  If you come along to watch our session and learn more about this then do say hello!  Look forward to seeing you there.

Posted in Power BI, SharePoint | Tagged | Leave a comment

Pausing Long-Running PowerShell

I recently developed a PowerShell script that was going to run for a few days.

Given it was going to run for so long, I really wanted to be able to pause it if necessary to prevent having to start all over again. Not only that, but ideally I wanted others to be able to pause it too.

The script was running in bite-size batches so my initial thinking was to add a Start-Sleep at the start of each batch and look for keyboard input. However, this only works if it is running as a service account so others can log in to access the script window.

I decided to combine this concept with checking the content of a text file. If it contains YES then just carry on as usual, otherwise, sleep and then check again.

This means that anybody can edit the text file, change the contents and save it – and the script will gracefully pause when it gets to the next convenient point.

To start it up again then anybody with access can just edit the text file, set the value to YES, and the script will start up again as if nothing happened when it gets to the end of the current sleep.

$batchNum = 1;
$continueFile = 'continue.txt';
Write-Host "Starting . . .";
do {
  Write-Host "Batch $batchNum";
  do {
    $continue = Get-Content $continueFile;
    if ($continue -ne 'YES') {
      Write-Host "Pausing for 10 seconds - to restart ensure continue.txt = YES";
      Start-Sleep 10;
    } else {
      Write-Host "Continuing . . .";
    }
  } while ($continue -ne 'YES')
  Start-Sleep 10;
  $batchNum++;
} while ($batchNum -lt 1000)
Write-Host "Finished . . .";

Of course, if you really need to then you can always CTRL+C to cancel the script at any stage too, but this is a simple way to not only allow the script owner to pause but allow others to pause too.

Posted in PowerShell | Tagged , , , , , , | Leave a comment

Power BI – Maps

OK, so it has been a while since my last post.  Too busy?  Lack of inspiration? Tired fingers?  Lots of excuses but I finally got around to dusting off the keyboard so brace yourself for some Power BI.

If any of you have not yet taken a look at Power BI then you are missing a treat.  It has come a long way since the early days of the Excel plug-in with a great desktop app which is free to download – so what are you waiting for?  I will be presenting a workshop and session at the Digital Workplace Conference in Sydney coming up in August so you have no excuses.  Well maybe just finish reading this first?

Maps can really give your data some visual context and they are really easy to do in Power BI but there are a few little tips to prepare your data so that is what I am going to focus on today.

The first thing I am going to do is grab the Australian States and Territories from a web page.

Select Get Data and choose Web as the source.  Then paste in a good URL for your data:

PowerBIWeb

Clicking OK will take you to the Navigator page which lets you choose which data on the page you would like to include.  In this case I want the Statistics table so I tick that and click Load:

PowerBIWebNavigator

So now we have some geographic data we are ready to create a map right?  Well not quite.  The problem is that there seem to be other geographic places around the world with the same names, so just creating a map as it is will likely give you some unexpected results – and using abbreviations is even worse.

The first thing I want to do is add a column to our data.  I could do this through the Data view but I want to try out a cool new feature so use Edit Queries and select Add Column from the tabs at the top of the page.  Select the State / Territory column and then choose Column From Examples -> From Selection:

PowerBIFromSelection

Type into the first row of the column created:

Australian Capital Territory, Australia

You will notice that Power BI automatically assumes you want the same pattern applied to all the other rows too:

PowerBICombined

Click, OK then Close and Apply and you now have a column which also references the country.  Even I could not confuse that with Victoria in South Africa.

One last step.

Select the new column – I have left it with the default name Combined – and from the Modelling tab choose Data Category -> State or Province:

PowerBICategory

We are now ready to create our map.  In the Report view click on the Combined column and Land Area km2 and then choose the Map or the Filled Map:

PowerBIFilledMap

Nice work!  We got to load data from a web site, add a column by example, correctly categorise our data and create a chart.  Not bad for a few minutes work!

Have fun – and do come say hello at the conference if you are attending.

Posted in Office 365, Power BI | Tagged , , , | Leave a comment

Missing out on Intellectual Property

If your organisation is using shared folders with restricted access then you will almost certainly not be realising the potential value of your intellectual property.

Take a look at my post on the Cost of Information Silos and then try calculating with figures from your own organisation.

You will probably be surprised at how much you are missing out on!

Posted in Office 365, SharePoint | Tagged , , , , , , | Leave a comment

Set JSLink on a Site Column With JSOM

I remain very impressed with JSLink and what it can do, particularly related to individual site columns.  While preparing a presentation for the local Office 365 Saturday event here in Brisbane, Queensland I realised that while it is easy to connect a JSLink script to a site column using PowerShell, there have been many occasions on client sites where I have been limited to Site Collection administrator access permissions with no access to a server.

While I live in hope that one day Microsoft might add that simple text field to the properties of a site column in the browser, I figured it must be possible using JavaScript with JSOM.

And of course it is . . .


var context = new SP.ClientContext.get_current();
var web = context.get_web();
var field = web.get_availableFields().getByTitle("My Site Column");
context.load(field);
context.executeQueryAsync(function(){
field.set_jsLink("~sitecollection/Style Library/custom/MyJSLink.js");
field.updateAndPushChanges(true);
context.executeQueryAsync(function(){
var jsl = field.get_jsLink();
console.log(jsl);
});
});

This can be run from the console in a browser – just make sure you use your site column name and set the path to your script. You do also need to be logged in as a Site Collection administrator. Oh, and it works for Office 365 too.

There is also a copy on GitHub if you prefer.

Happy JSLinking!

Posted in JSLink, Office 365, SharePoint | Tagged , , , , , , | 2 Comments

Site Column Display Templates – KPIs

Furthering my theme of Site Column Display Templates, this is really simple but one that I will definitely reuse over and over.

Site Column
Title: kpiIcon
Type: Choice [Red, Yellow, Green]

This site column can now be added to any list or library as usual.

Display Template
You can copy or download the complete display template from GitHub.

var paylord = paylord || {};
paylord.kpi = paylord.kpi || {};

paylord.kpi.viewFieldTemplate = function(ctx) {
var kpi = ctx.CurrentItem[ctx.CurrentFieldSchema.Name];
var suffix = "";
if (kpi == "Green") {
suffix = "0.gif";
} else if (kpi == "Red") {
suffix = "2.gif";
} else {
suffix = "1.gif";
}
var ret = "<img title="&quot; + kpi + &quot;" src="/_layouts/images/kpidefault-&quot; + suffix + &quot;" alt="" />";
return ret;
};

(function () {
var fieldCtx = {};
fieldCtx.Templates = {};
fieldCtx.Templates.Fields = {
"kpiIcon": {
"View": paylord.kpi.viewFieldTemplate,
"DisplayForm": paylord.kpi.viewFieldTemplate
}
};

SPClientTemplates.TemplateManager.RegisterTemplateOverrides(fieldCtx);

})();

Told you it was simple. The scoping object is set up to keep it behaving nicely then my function checks the selected choice value (Red, Yellow or Green) and returns an image using the standard SharePoint icons.

In this case I have not made any change to the edit mode but applied my function to both the View and Display modes.

PowerShell
The ability to add the JSLink property through the UI to a Site Column seems to have been forgotten by Microsoft so I am hoping we can encourage them to make this simple enhancement – add your vote through User Voice.

In the meantime we are stuck with using a few lines of PowerShell:

$web = Get-SPWeb "http://sitename"
$field = $web.Fields["kpiIcon"]
$field.JSLink = "~sitecollection/Style Library/custom/KPI.js"
$field.Update($true)
$web.Dispose()

Summary
Choosing the KPI value is not changed at all so is a standard radio button:
Choosing KPI

When in display or view mode the KPI is displayed as an icon:
viewKPI

Completely reusable by anybody with the ability to add columns to list or libraries – a great and simple addition to any SharePoint environment.

Posted in SharePoint | Tagged , , , , | 3 Comments

Display Templates – Colour Picker

Following on from my recent post which explores the potential of using Display Templates with Site Columns I wanted to expand on that concept with another idea that has proved a challenge in SharePoint – a colour picker.

There are several times in the past I have wanted to allow a user to choose a colour – perhaps for a particular category in a list driven menu. Display Templates let me do just this.

Site Column
Name: ColourPicker
Type: Single line of text

As usual, you can give this a friendly display name by editing after it has been created, but that is all you need to do for the site column. It is ready to be added to any list or library and will hold the hex value of the selected colour.

Display Template
You can get the full Display Template here on GitHub. Note that I have extended the basic concept to also display the RGB values just in case you need them. As is my usual approach I have saved my file into a custom folder inside my Style Library.

The invertColour function simply lets me show the hex value in display mode using a contrasting colour to the background which is my selected colour.

paylord.colourPicker.invertColour = function(hexTripletColor) {
    var color = hexTripletColor;
    //color = color.substring(1);         // remove #
    color = parseInt(color, 16);          // convert to integer
    color = 0xFFFFFF ^ color;             // invert three bytes
    color = color.toString(16);           // convert to hex
    color = ("000000" + color).slice(-6); // pad with leading zeros
    //color = "#" + color;                // prepend #
    return color;
}

To be able to show the RGB values of my selected colour, I also need to convert from hex:

paylord.colourPicker.hexToRgb = function(hex) {
    // Expand shorthand form (e.g. "03F") to full form (e.g. "0033FF")
    var shorthandRegex = /^#?([a-f\d])([a-f\d])([a-f\d])$/i;
    hex = hex.replace(shorthandRegex, function(m, r, g, b) {
        return r + r + g + g + b + b;
    });

    var result = /^#?([a-f\d]{2})([a-f\d]{2})([a-f\d]{2})$/i.exec(hex);
    return result ? {
        r: parseInt(result[1], 16),
        g: parseInt(result[2], 16),
        b: parseInt(result[3], 16)
    } : null;
}

So now I bring those together with a template to display the selected value in view mode:

paylord.colourPicker.colourViewTemplate = function(ctx) {
	var colour = ctx.CurrentItem[ctx.CurrentFieldSchema.Name];
	if (colour == "") {
		colour = "353535";
	}
	
	if (colour[0] == "#") {
		colour = colour.substring(1);
	}
	
	var rgb = paylord.colourPicker.hexToRgb(colour);
	var title = "";
	title = "R:" + rgb.r + " G: " + rgb.g + " B:" + rgb.b;
	
	var fontColour = paylord.colourPicker.invertColour(colour);

	var ret = "<div title='" + title + "' style='background-color: #" + colour + ";color:#" + fontColour + ";padding: 0px 5px;'>" + colour + "</div>";
	return ret;
}

So now to focus on setting the colour. What I want to do is grab the current value or set a default if it is blank then ensure I set the class so my field is recognised by the colour picker:

paylord.colourPicker.colourEditTemplate = function(ctx) {
	var formCtx = SPClientTemplates.Utility.GetFormContextForCurrentField(ctx); 
	formCtx.registerGetValueCallback(formCtx.fieldName, paylord.colourPicker.getFieldValue.bind(null, formCtx.fieldName));
	var elId = "paylord-" + formCtx.fieldName;
	
	var colour = ctx.CurrentItem[ctx.CurrentFieldSchema.Name];
	if (colour == "") {
		colour = "#353535";
	}
	var ret = "<input id='" + elId + "' class='color' value='" + colour + "'>";
	return ret;
};

And finally, I register my templates:

(function () {
	var colourCtx = {};
	colourCtx.Templates = {};
	colourCtx.Templates.Fields = {
		"Colour": {
			"View": paylord.colourPicker.colourViewTemplate,
			"DisplayForm": paylord.colourPicker.colourViewTemplate,
			"EditForm": paylord.colourPicker.colourEditTemplate,
			"NewForm": paylord.colourPicker.colourEditTemplate
		}
	};
	
	SPClientTemplates.TemplateManager.RegisterTemplateOverrides(colourCtx);

})();

Colour Picker Script
For the purposes of this example, I decided to go with a pure JavaScript colour picker rather than one dependent on jQuery. There are many to choose from out there so feel free to experiment and find one you like. I went with JSColor which is really easy to interface with as all I had to do was give the input field a class of “color”.

PowerShell
In this case, our template needs both the Display Template and the JSColor script so this introduces the ability to add multiple scripts to our Site Column. It is just the same as before but we separate each script we want to reference with a pipe ¦ character:

$web = Get-SPWeb "http://sitename"
$field = $web.Fields["ColourPicker"]
$field.JSLink = "~sitecollection/Style Library/custom/jscolor.js¦~sitecollection/Style Library/custom/ColourPicker.js"
$field.Update($true)
$web.Dispose()

The Resulting Column in Action

Colour Picker showing RGB hover text

Colour Picker showing RGB hover text

Colour Picker Showing Picker

Colour Picker Showing Picker

So here is the resulting column in display mode and edit mode. When you click on the input in edit mode then the colour picker appears and lets you choose the colour you like which then stores the hex value in the text field.

JSLink Property
Being able to add the JSLink through the standard browser interface settings for the site column would make this whole approach so much more flexible so I have raised it as a suggestion on User Voice – please add your vote.

Posted in SharePoint | Tagged , , , , | Leave a comment

Display Templates for Site Columns – Harvey Balls

So one of the little things with XSL that has bugged me is that it seems harder to change just one column than it should be – and of course, you have to apply the XSL every time you want a view to be changed. I have recently managed to spend a bit of time taking a look at 2013 Display Templates and I was very excited to find that this resolves both of these issues by allowing a Display Template to be attached to a Site Column.

This means that every time that Site Column is added to a list, your custom Display Template will be applied to it – very nice.

But the goodness does not stop there. Within the Display Template you can also change how the column appears depending on what you are doing with it – so in create or edit mode it can look completely different to view or display mode. This opens up a whole range of exciting possibilities.

Sitting at Auckland airport after the New Zealand SharePoint Conference last month I had the pleasure to sit and discuss this with Marc Anderson who wondered if it was possible to show Harvey Balls in this way. Well that seemed like an opportunity too good to miss so here we go.

Site Column
Firstly we need to create our Site Column. I am going to assume you know how to create a site column but the properties we need are below:
Column Name: HarveyBalls
Type: Choice
Choices: 0, 1, 2, 3, 4
Display Using: Radio Buttons

Good start. What I usually do is then edit the Site Column and change the Name to a more friendly display name – in this case: Harvey Balls.

So, our column at this point is ready to be added to any list or library but will simply display as a radio button offering the choices from 0-4.

Display Template
Again, there are some great blogs and articles out there on the basics of creating Display Templates so I am not going to go into too much background.

My first attempt used Unicode characters which was nice and simple but did not look great. A CSS version of Harvey Balls added a tiny bit more complexity to the script but looked much better.

My Display Template can be found on GitHub and that is definitely the best way to grab a copy for your own use. I will also not try quoting the full script here as it never seems to play nicely!

First we define our namespace and a function to display our field. Within this function we have an array with 5 options to match our choices (0-4) which are actually the CSS classes we want.

var balls = ["harvey", "upper-right", "harvey half-right", "three-quarters", "harvey black"];

We then get the current selected value of our field which will be 0-4 and just to be safe set it to 0 if it is empty:

var ball = ctx.CurrentItem[ctx.CurrentFieldSchema.Name];
if (ball == "") {
	ball = 0;
}

A string is then constructed containing a DIV with the class set to the value from our array which matches the choice value:

var ret = "";
switch (ball) {
	case "1":
		ret = "<div class='harvey'><div class='" + balls[ball] + "'><i></i></div></div>";
		break;
	case "3":
		ret = "<div class='harvey black'><div class='" + balls[ball] + "'><i></i></div></div>";
		break;
	default:
		ret = "<div class='" + balls[ball] + "'><i></i></div>";
		break;
};

Our string is then returned and this HTML is what is put on the page to represent our Site Column.

I chose to make the Display Template completely standalone so the next section in the script adds the required CSS to the page to present our Harvey Balls. This could also just be added to a standard CSS file.

Finally, we define template object and register it with SharePoint:

var fieldCtx = {};
fieldCtx.Templates = {};
fieldCtx.Templates.Fields = {
	"HarveyBalls": {
		"View": paylord.harveyBalls.viewFieldTemplate,
		"DisplayForm": paylord.harveyBalls.viewFieldTemplate
	}
};
SPClientTemplates.TemplateManager.RegisterTemplateOverrides(fieldCtx);

Note that in this case we are only changing the way the field looks in view and display modes.

These scripts can be saved anywhere but I usually add them to a custom folder in my Style Library.

PowerShell
Now, unfortunately Microsoft seem to have forgotten to add the JSLink property to the UI of Site Columns so the simplest way to link our script to our Site Column is a few lines of PowerShell:

$web = Get-SPWeb "http://sitename"
$field = $web.Fields["Harvey Balls"]
$field.JSLink = "~sitecollection/Style Library/custom/HarveyBalls.js"
$field.Update($true)
$web.Dispose()

I have simplified the PowerShell here but the GitHub version linked above will prompt for the values it needs. Main thing to note here is the “~sitecollection” element as part of the path – make sure you include this or one of the other alternatives depending upon where you have saved the file. Relative paths and even full paths do not seem to work well.

Summary
That is it! You can now add your Site Column as usual to any list or library, be able to choose 0-4 from the radio button and this will then be displayed as the related Harvey Balls icon when in view or display mode.

Harvey Balls

I will definitely being doing some more of these so watch this space!

Posted in SharePoint | Tagged , , , , | 2 Comments